-

How to Find the Best Sportbike Salvage Yard Near You: Breathe New Life into Your Ride
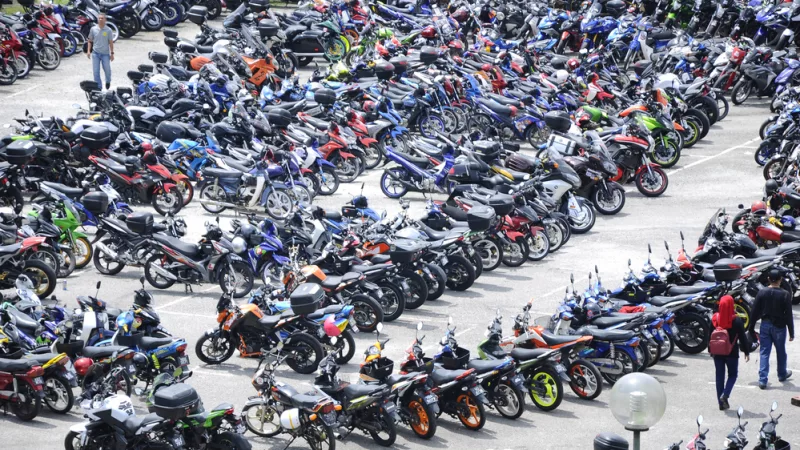
For passionate sportbike riders, keeping their machines running smoothly and looking sharp is a constant pursuit. But the sting of repair costs can sometimes dampen the thrill of the ride. That’s where sportbike salvage yards come in, offering a treasure trove of used parts at a fraction of the price of new ones.
However, navigating the world of salvage yards can be daunting, especially for first-timers. This comprehensive guide will equip you with the knowledge and strategies to locate the best sportbike salvage yard near you and score the perfect parts for your motorcycle.
Key Takeaways:
- Sportbike salvage yards offer cost-effective, environmentally friendly options for finding used parts for your motorcycle.
- Consider factors like inventory, reputation, distance, and services offered when choosing a salvage yard.
- Utilize online directories, search engines, local communities, and word-of-mouth recommendations to find suitable yards.
- Prepare thoroughly before visiting, including calling ahead, gathering information, dressing appropriately, and potentially bringing tools.
- Inspect parts carefully, negotiate prices respectfully, and prioritize safety while navigating the salvage yard.
Comparison Table: New vs. Used Sportbike Parts
Feature New Parts Used Parts (Sportbike Salvage Yard) Cost Significantly higher Significantly lower Availability Readily available for most models Wider variety, potentially including hard-to-find parts for older models Environmental Impact Higher due to resource extraction and manufacturing Lower due to part reuse Quality Guaranteed brand new and undamaged May show signs of wear and tear, requiring careful inspection Warranty Typically covered by manufacturer warranty May or may not be offered by the salvage yard 
Why Choose a Sportbike Salvage Yard?
Why Choose a Sportbike Salvage Yard?
Here are some compelling reasons to consider a sportbike salvage yard for your repair needs:
- Cost-Effectiveness: Used parts cost significantly less than new ones, making them ideal for budget-conscious riders.
- Part Availability: Salvage yards often stock a wide variety of parts, including hard-to-find components for older models.
- Environmental Friendliness: Reusing existing parts reduces the demand for new materials and minimizes environmental impact.
- Project Potential: Salvage yards can be a goldmine for enthusiasts working on restoration projects or customizing their bikes.
Finding the Right Salvage Yard: Factors to Consider
Before venturing out, consider these factors to narrow down your search and find the best sportbike salvage yard for your needs:
- Inventory: Does the yard specialize in sportbikes, or do they offer parts for various motorcycle types? Knowing their focus helps ensure they have the specific parts you need.
- Reputation: Research online reviews and testimonials from other riders to gauge the yard’s reputation for quality parts, fair pricing, and customer service.
- Distance: Consider the travel distance and weigh it against the potential savings and availability of parts.
- Services Offered: Does the yard offer additional services like part removal, installation assistance, or even delivery? These can be valuable perks.
Tools and Techniques for Your Search:
- Online Directories: Utilize online directories dedicated to locating salvage yards in your area.
- Search Engines: Leverage search engines like Google, using relevant keywords like “sportbike salvage yard near me” or “used sportbike parts + [your city/state]”.
- Local Forums and Communities: Engage with online communities or forums frequented by sportbike riders in your area. They often share recommendations and insights about local salvage yards.
- Word-of-Mouth: Don’t underestimate the power of personal recommendations. Ask fellow riders, mechanics, or motorcycle shops for their suggestions.
Visiting the Salvage Yard: Tips for Success
Once you’ve identified a promising sportbike salvage yard, here are some tips for a successful visit:
- Call Ahead: Contact the yard beforehand to confirm their operating hours, inquire about specific parts availability, and ask if they have a pull-your-own policy (where you remove the parts yourself) or if they offer removal assistance.
- Gather Information: Prepare a list of the parts you need, including model-specific details, and take pictures of your bike for reference if needed.
- Dress for the Occasion: Wear sturdy shoes and closed-toe footwear, as salvage yards can be dusty and have uneven surfaces.
- Bring Tools (optional): If the yard allows pull-your-own options, bring basic tools like wrenches and screwdrivers to remove the parts you need.
- Negotiate: While not always applicable, some salvage yards are open to negotiation, especially for larger purchases. Be polite and respectful when making an offer.
- Inspect the Parts Thoroughly: Before purchasing any part, meticulously inspect it for any damage, wear and tear, or missing components. Ensure it aligns with your needs and expectations.
Beyond the Parts: Additional Resources and Considerations
Finding the perfect sportbike salvage yard is just the first step. Remember these additional points:
- Safety First: Always prioritize safety when navigating a salvage yard. Wear protective gear and be cautious around machinery and potential hazards.
- Ask Questions: Don’t hesitate to ask the yard staff for assistance or clarification regarding parts, compatibility, or their return policy.
- Warranty Options: Explore whether the yard offers any warranties on the parts you purchase, providing peace of mind in case of unforeseen issues.
6 FAQs: Finding the Perfect Parts at a Sportbike Salvage Yard
-
Do I need to be a mechanic to navigate a sportbike salvage yard?
- While familiarity with motorcycles is helpful, it’s not mandatory. Many salvage yards have staff available to assist and answer questions.
-
What happens if the part I buy is damaged?
- Most salvage yards have a return policy, but always inquire about specific details and timelines before purchasing.
-
Can I negotiate prices at a sportbike salvage yard?
- While not always possible, some yards are open to negotiation, especially for larger purchases. Be polite and respectful when making an offer.
-
What safety precautions should I take when visiting a sportbike salvage yard?
- Wear closed-toe shoes, be mindful of uneven surfaces, and avoid touching any machinery or electrical equipment.
-
How can I ensure the compatibility of a used part with my specific motorcycle model?
- Consult your owner’s manual, research online forums, or seek assistance from the salvage yard staff to confirm compatibility.
-
What are some alternative options if I can’t find the part I need at a salvage yard?
- Online marketplaces and dealerships specializing in used motorcycle parts can be explored as alternative options.
By following these tips and utilizing the resources available, you can confidently navigate the world of sportbike salvage yards and find the perfect parts to breathe new life into your beloved machine, all while saving money and potentially reducing your environmental footprint. Remember, a little research and preparation can go a long way in ensuring a successful and rewarding experience.
-
Exploring the World of Yamaha Sportbikes: A Beginner’s Guide
If you’re new to the world of sportbikes, Yamaha is a great place to start. With a wide range of models, there’s a Yamaha sportbike for every rider, whether you’re a beginner or a seasoned pro. In this guide, we’ll take a closer look at what Yamaha has to offer and help you find the perfect sportbike for your needs.
Understanding the Different Types of Yamaha Sportbikes
When it comes to sportbikes, Yamaha offers a wide range of models to choose from, each with their own unique characteristics and features. Understanding the different types of Yamaha sportbikes can help you narrow down your options and find the perfect bike for your needs.
- Sportbikes: These are the most powerful and agile bikes in Yamaha’s lineup, built for speed and handling. They include models like the R1, R7, R6, and R3. These bikes feature aerodynamic bodywork and are designed to be ridden at high speeds. They typically have high-performance engines and advanced suspension systems, making them ideal for track riding and sporty street riding.
- Supersports: These are similar to sportbikes but with a more comfortable riding position and slightly less power. They include models like the FZ-09 and FZ1. These bikes are built for riders who want the performance of a sportbike but with a more relaxed riding position. They typically have slightly detuned engines and more comfortable seats, making them a great option for long-distance riding.
- Naked Bikes: These are sportbikes with no fairings or bodywork, giving them a more raw, stripped-down look. They include models like the FZ-07 and FZ-10. These bikes are designed to be ridden in a more upright position and often have more accessible power and torque. They’re more versatile than sportbikes and can be used for both city and highway riding.
- Sport Touring Bikes: These are sportbikes with added features for long-distance riding, such as comfortable seats and large storage capacity. They include models like the FJR1300 and Super Ténéré. These bikes have more comfortable seating, wind protection, and luggage capacity. They’re designed for long-distance riders who want the performance of a sportbike but with the added convenience of touring features.
By understanding the different types of Yamaha sportbikes, you can make a more informed decision about which bike is right for you. Whether you’re a beginner looking for an entry-level bike or an experienced rider looking for a track-ready machine, Yamaha has a sportbike that will fit your needs.

Getting to Know the Yamaha R Series
The Yamaha R Series is a line of sportbikes that is well-known for its high-performance engines and advanced suspension systems. The R Series includes models like the R1, R6, and R3. These bikes are designed for riders who want the ultimate in speed and handling, and are some of the most powerful and agile bikes in Yamaha’s lineup.
- Yamaha R1: The R1 is the flagship model of the R Series. It is powered by a 999cc liquid-cooled, inline four-cylinder engine that produces over 200 horsepower. The R1 also features a slipper clutch, advanced suspension system, and a quick-shifter. This bike is designed for experienced riders who want the ultimate in speed and handling.
- Yamaha R6: The R6 is another popular model in the R Series. It is powered by a 599cc liquid-cooled, inline four-cylinder engine that produces over 130 horsepower. The R6 also features a slipper clutch, advanced suspension system, and a quick-shifter. This bike is designed for experienced riders who want a sporty, high-performance motorcycle with a more manageable power output.
- Yamaha R3: The R3 is the entry-level model of the R Series. It is powered by a 321cc liquid-cooled, inline twin-cylinder engine that produces over 41 horsepower. The R3 also features a slipper clutch, advanced suspension system, and a quick-shifter. This bike is designed for beginner riders who want to experience the thrill of a sportbike, but with a more manageable power output.
Overall, the Yamaha R Series is a line of high-performance sportbikes that is perfect for riders who want the ultimate in speed and handling. Whether you’re an experienced rider looking for a track-ready machine or a beginner looking for an entry-level bike, the R Series has a model that will fit your needs.
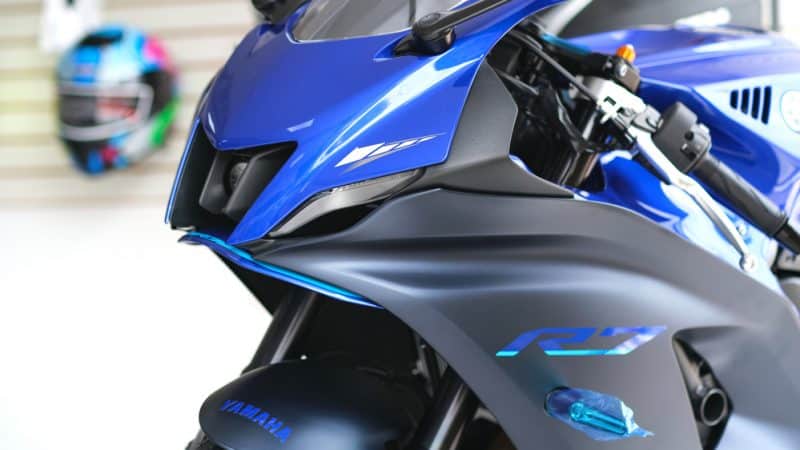
Yamaha R7: The Controversial Model
The Yamaha R7 was a limited edition sportbike that was produced by Yamaha from 1999 to 2002. The bike was based on the YZF-R1, but featured a smaller engine and a more compact frame. The R7 was designed to compete in the Superstock class of road racing, and it was quite successful in that regard.
However, the R7 was also notorious for its high price tag and limited availability. At the time, it cost significantly more than the standard R1, and only 500 units were produced each year. This made the R7 a highly sought-after bike, but also one that was difficult to obtain.
Another controversial aspect of the R7 was its engine. The R7 was powered by a 749cc liquid-cooled, inline four-cylinder engine that produced around 120 horsepower. This was less than the standard R1, which produced around 150 horsepower. Some critics felt that the R7’s engine was underpowered for its price tag, while others praised its smooth power delivery.
Despite its controversies, the Yamaha R7 remains a highly respected bike among sportbike enthusiasts. Its rarity and exclusivity make it a highly desirable bike, and its performance on the track is still highly regarded. However, it is important to remember that the R7 was designed for a specific purpose, as a Superstock racing bike, and it’s not a bike for everyone. It might not be suitable for daily riders or for those who want a more versatile motorcycle.
Other Yamaha Sportbikes to Consider
In addition to the R Series, Yamaha offers a variety of other sportbikes that are worth considering. Some of the other popular models include:
- Yamaha FZ Series: This is a line of sportbikes that is designed for riders who want a balance of speed and practicality. The FZ Series includes models like the FZ-09, FZ-07, and FZ-10. These bikes are powered by liquid-cooled, inline four-cylinder engines and feature advanced suspension systems. They are perfect for riders who want a sporty motorcycle that can be used for both commuting and weekend rides.
- Yamaha MT Series: This is a line of sportbikes that is designed for riders who want a more aggressive riding position. The MT Series includes models like the MT-09, MT-07, and MT-10. These bikes are powered by liquid-cooled, inline four-cylinder engines and feature advanced suspension systems. They are perfect for riders who want a sporty motorcycle that can be used for both commuting and weekend rides, but with a more aggressive riding position.
- The V-Max: This is a muscle bike that is powered by a massive 1,679cc liquid-cooled, V4 engine. It produces over 170 horsepower and features advanced suspension systems. It is designed for experienced riders who want a powerful and unique motorcycle that can be used for both commuting and weekend rides.
- The Super Ténéré: This is a adventure bike that is powered by a liquid-cooled, parallel twin-cylinder engine. It produces over 110 horsepower and features advanced suspension systems. It is designed for experienced riders who want a powerful and unique motorcycle that can be used for both commuting and weekend rides.
Overall, Yamaha offers a wide range of sportbikes that are perfect for riders of all experience levels. Whether you’re a beginner looking for an entry-level bike or an experienced rider looking for a high-performance machine, Yamaha has a model that will fit your needs.
Choosing the Right Yamaha Sportbike for You
When choosing a Yamaha sportbike, it’s important to consider your experience level, riding style, and budget. If you’re a beginner, the R3 or FZ-07 may be a good place to start. If you’re an experienced rider looking for a track-ready bike, the R1 or R6 may be a better fit. And if you’re looking for a sporty yet versatile ride, the FZ-09 or FZ1 may be the perfect choice.
In conclusion, Yamaha has a lot to offer for sportbike riders, from entry-level bikes to track-ready machines. Take the time to research and compare different models, and make sure to test ride a few before making a decision. With the right Yamaha sportbike, you’ll be able to enjoy the thrill of the ride and push your limits on the road or track. Don’t forget to also consider the cost of ownership, including insurance, maintenance, and accessories. Overall, Yamaha Sportbikes are a great choice for any rider looking for a high-performance motorcycle that offers a balance of power, handling, and versatility. Happy riding!