-

Tips for Buying Your First Sportbike
Sportbikes are fast, flashy, and fun, but they are also complex machines that require a significant investment of time and money. Before you buy your first sportbike, it’s important to consider the following tips to make an informed decision and find the right bike for your needs.
Consider Your Riding Style:
Before you start shopping for a sportbike, it’s important to determine what type of riding you want to do. Do you want to push the limits of your bike on a racetrack or do you want a bike that’s comfortable for long-distance touring? Here are a few different styles of sportbikes to consider:
- Track-focused sportbikes: These bikes are designed for high-speed, aggressive riding on a racetrack. They have powerful engines, lightweight frames, and advanced suspension systems. They are not recommended for daily street riding as they are not well-suited for comfort and practicality.
- Street-oriented sportbikes: These bikes are designed for fast and nimble street riding. They are lightweight, have powerful engines, and are typically more comfortable than track-focused sportbikes. They are ideal for riders who want a sporty and fun riding experience on public roads.
- Sport-touring bikes: These bikes are designed for long-distance riding and offer the best of both worlds: performance and comfort. They are equipped with large fairings, windscreens, and comfortable seats, making them ideal for riders who want to cover long distances in comfort.
By considering your riding style and the type of riding you want to do, you’ll be able to narrow down your options and find the right sportbike for your needs.

Set Your Budget:
Sportbikes can be expensive, and the cost of ownership goes beyond just the purchase price. Before you start shopping, it’s important to set a budget and consider the ongoing costs of ownership, including insurance, maintenance, and upgrades.
Here are a few tips to help you stay within your budget:
- Determine how much you can afford to spend: Consider your monthly income and expenses, and determine how much you can comfortably afford to put towards your sportbike.
- Factor in insurance costs: Insurance is an essential part of owning a sportbike, and the cost can vary greatly depending on the type of bike and your location. Research insurance rates before you buy, and factor these costs into your budget.
- Plan for maintenance costs: Sportbikes require regular maintenance, and the costs can quickly add up. Make sure to factor in the cost of oil changes, tire replacements, and other routine maintenance items into your budget.
- Consider the cost of upgrades: Many sportbike owners like to make upgrades to their bikes, and the costs can quickly add up. Consider the cost of upgrades and factor these into your budget before you buy.
Remember, the most expensive bike is not always the best, and there are many affordable options that offer excellent performance and value. By setting a budget and considering the ongoing costs of ownership, you’ll be able to find the right sportbike that fits your needs and your budget.
Find the Right Size:
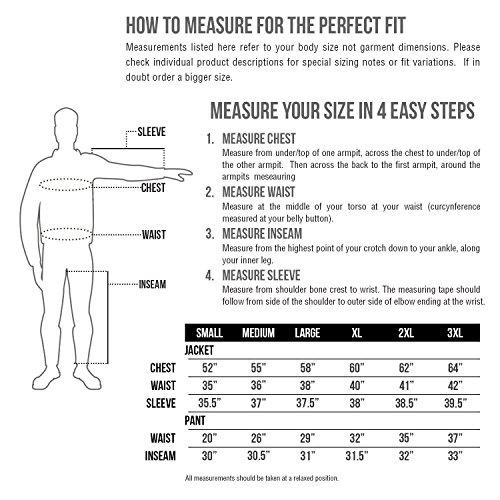
When buying a sportbike, it’s important to find the right size and fit to ensure maximum comfort and control while riding. Here are a few tips to help you find the right size:
- Consider your height, weight, and inseam length: The size of a sportbike can greatly affect how comfortable and in control you feel while riding. Use your height, weight, and inseam length to determine which bikes might be the right size for you.
- Test-ride several models: The best way to determine the right size is to test ride several different models. This will give you a chance to get a feel for each bike and see how well it fits you.
- Check the seat height: When test riding, pay attention to the seat height. You should be able to comfortably reach the ground with both feet while seated on the bike.
- Consider the reach to the handlebars: The reach to the handlebars is also important, as it affects your comfort and control while riding. Make sure the reach is comfortable and that you can easily reach the controls.
- Check the weight: The weight of a sportbike can greatly affect how comfortable and in control you feel while riding. Be sure to take note of the weight of each bike you test ride and consider how it affects the overall feel of the bike.
By considering your height, weight, and inseam length, and test riding several models, you’ll be able to find the right size and fit for your needs and ensure maximum comfort and control while riding your sportbike.

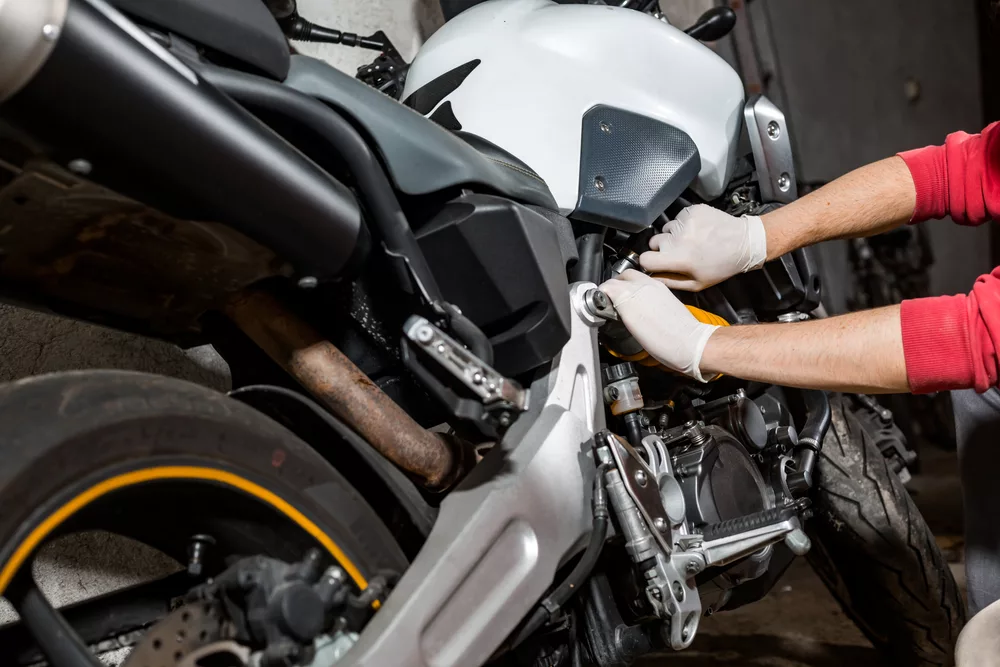
Inspect the Bike Carefully
Before you buy a sportbike, inspect it carefully for any signs of damage or wear. Check the wheels, tires, brakes, and suspension for any signs of damage, and make sure the engine runs smoothly and quietly. If you’re unsure about anything, have a mechanic inspect the bike before you make a purchase.
Additionally, pay attention to the bike’s overall appearance. Look for any signs of rust or corrosion, especially in areas such as the exhaust pipes, frame, and suspension components. Check the battery to make sure it holds a charge and has enough power to start the engine. Test the bike’s electrical system to ensure all lights, signals, and gauges are working properly. Check the air filter and oil level, and make sure the bike has been properly maintained and serviced according to the manufacturer’s guidelines.Another important aspect to consider is the bike’s history. Make sure to request a vehicle history report to determine if the bike has been in any accidents, or if it has a clean title. If you’re buying a used bike from a dealer, ask about the previous owner and if the bike has been well taken care of. If you’re buying from a private seller, be cautious and take a close look at the bike to see if it has any signs of abuse or neglect.
It’s also important to test ride the bike before making a purchase. This will give you a good feel for the bike’s handling, braking, and acceleration. Take the bike on different types of roads, including highways, twisty roads, and stop-and-go traffic, to get a good idea of how it handles different conditions. This will also help you determine if the bike is comfortable for you and if it’s the right size and fit for your needs.
In summary, thoroughly inspecting a sportbike before making a purchase is a critical step in ensuring you’re getting a high-quality, reliable machine that will provide you with years of riding enjoyment.
Research the Model and Brand
When researching a sportbike, it’s important to take a deep dive into the model and brand you’re interested in. This will give you an understanding of the bike’s history, reliability, and any common problems riders have experienced. Start by reading reviews from trusted sources to get a better understanding of the bike’s strengths and weaknesses. You can also visit online forums and read what other riders have to say about their experiences with the bike. Ask questions and take note of any common complaints or issues that have been raised. This information can be invaluable in helping you make an informed decision. Additionally, consider reaching out to the manufacturer or a dealership to learn about any current or upcoming models that may interest you. It’s always a good idea to do your due diligence before making a big purchase, and researching the sportbike you’re interested in is a key step in that process.
Conclusion
In conclusion, when it comes to buying your first sportbike, there are many factors to consider. From determining your riding style and setting a budget, to finding the right size and fit, and carefully inspecting the bike before making a purchase, each step is important in ensuring you make the right choice for your needs. Additionally, researching the model and brand you are interested in will give you valuable insight into the bike’s history, reliability, and common problems. With this information, you will be able to make an informed decision and enjoy many years of thrilling riding. Don’t be afraid to take your time and shop around, the right sportbike is out there waiting for you. Happy riding!