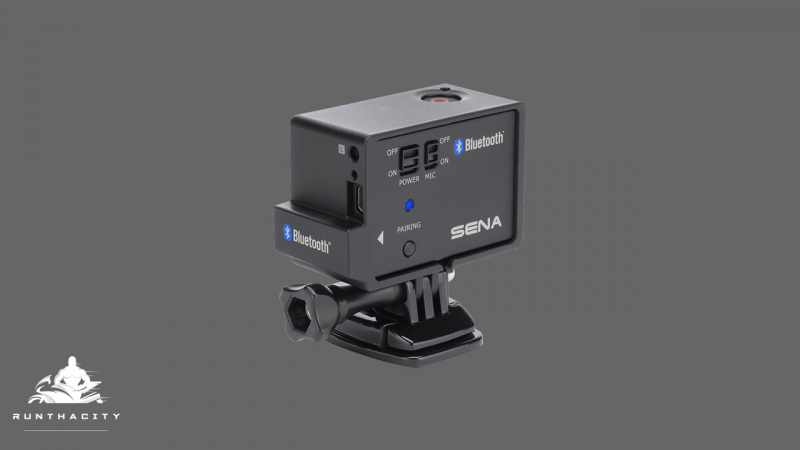
If you want to gain valuable experience, then you go to school. The same applies to motorcycle riding. When you sign up for the Beginner or Basic Rider courses that are available from multiple organizations throughout the U.S., you are taking a giant step forward. Here is what to expect:
Pre-Course Assignment
The assignment that you receive is dependent on the organization that you sign up with. Make sure you do this work, because you will be better prepared for what is to come in the class. You are welcome to take notes, write down questions to ask the instructor, and familiarize yourself with the terminology.
Necessary Items
When you have class, you should bring your student handbook, a notepad, pen, and some food items for snacks and lunch. These classes will last for most of the day, so be prepared for a full day of learning and moving.
You should wear jeans with ankle boots, a long-sleeved shirt or jacket, full fingered gloves, and a DOT-legal helmet. Some schools will have helmets to borrow if you don’t have one. Keep in mind that you won’t be able to attend the class if you don’t have the appropriate gear.
Also, regardless of the weather, the class will go on. Be prepared for cold mornings. Lightweight layers are best, because you can peel them off as you get hot. You should also wear a waterproof jacket, boots, and gloves, just in case it rains.
What Happens In The Class
The class structure depends on statewide regulations and the course provider. However, most programs cover the same points. The courses are completed within two days, although you can sign up for more advanced courses later on.
First Day
On the first day of the Basic Rider Course, you don’t want to be late. Anyone who arrives late has a direct impact on how much information you receive—and you don’t want to miss anything. Before you turn on the engine, you need to sign some liability papers and other paperwork. You might be asked to introduce yourself and talk about what experience you have on a motorcycle. It’s fine if you have zero experience, because the class is designed for beginners. Relax and enjoy the chance to make new riding buddies.
The first half of the day talks about basic riding mechanics. This should be considered review if you did the pre-course assignment. If you jotted down any questions in your notes, this is the time you ask.
The first riding exercise doesn’t send you off down the road with no assistance. You review the handlebar controls once again. You mount, dismount, and turn the vehicle on and off. You then get a feel of the manually-operated clutch. Gradually, you get familiarized with the motion of the bike
The exercises thereafter include riding in a straight line, shifting gears, turning and cornering. The class is paced to allow for you to absorb this information is quickly or slowly as you need.
Second Day
The second day builds off the operations you picked up on the first day. Now, you can get more technical and polish those skills. The session begins with practice of slow speed maneuvering, emergency braking, swerving, and more cornering.
Once these drills are complete, you are assessed on your competency. The riding test will be the most stressful part of the day, because you need to successfully complete the exercises. If you don’t pass, you can retest for free; but if you fail twice, consider that riding a motorcycle might not be for you.
Other Things To Expect
There’s a reason you sign a liability form. You could tip over or crash during the hands-on section of the course. Don’t worry, though. This, too, is practice. Once you have fallen a few times, you get the hang of controlling the bike. You will receive advice for staying upright from a professional instead of having to figure it out yourself.
All in all, a Basic Rider Course is an excellent choice for all new riders who want to gain valuable experience before hitting the road. Though the course only lasts for two whole days, you learn much more than you probably expect. Go in with an open mind and leave riding your motorcycle. After that, the road is yours to master.
Enjoyed this article? Want to learn more? Check out my YouTube channel and hit that subscribe button.
You Might also like
-
Tips for Buying Your First Sportbike
Sportbikes are fast, flashy, and fun, but they are also complex machines that require a significant investment of time and money. Before you buy your first sportbike, it’s important to consider the following tips to make an informed decision and find the right bike for your needs.
Consider Your Riding Style:
Before you start shopping for a sportbike, it’s important to determine what type of riding you want to do. Do you want to push the limits of your bike on a racetrack or do you want a bike that’s comfortable for long-distance touring? Here are a few different styles of sportbikes to consider:
- Track-focused sportbikes: These bikes are designed for high-speed, aggressive riding on a racetrack. They have powerful engines, lightweight frames, and advanced suspension systems. They are not recommended for daily street riding as they are not well-suited for comfort and practicality.
- Street-oriented sportbikes: These bikes are designed for fast and nimble street riding. They are lightweight, have powerful engines, and are typically more comfortable than track-focused sportbikes. They are ideal for riders who want a sporty and fun riding experience on public roads.
- Sport-touring bikes: These bikes are designed for long-distance riding and offer the best of both worlds: performance and comfort. They are equipped with large fairings, windscreens, and comfortable seats, making them ideal for riders who want to cover long distances in comfort.
By considering your riding style and the type of riding you want to do, you’ll be able to narrow down your options and find the right sportbike for your needs.
Set Your Budget:
Sportbikes can be expensive, and the cost of ownership goes beyond just the purchase price. Before you start shopping, it’s important to set a budget and consider the ongoing costs of ownership, including insurance, maintenance, and upgrades.
Here are a few tips to help you stay within your budget:
- Determine how much you can afford to spend: Consider your monthly income and expenses, and determine how much you can comfortably afford to put towards your sportbike.
- Factor in insurance costs: Insurance is an essential part of owning a sportbike, and the cost can vary greatly depending on the type of bike and your location. Research insurance rates before you buy, and factor these costs into your budget.
- Plan for maintenance costs: Sportbikes require regular maintenance, and the costs can quickly add up. Make sure to factor in the cost of oil changes, tire replacements, and other routine maintenance items into your budget.
- Consider the cost of upgrades: Many sportbike owners like to make upgrades to their bikes, and the costs can quickly add up. Consider the cost of upgrades and factor these into your budget before you buy.
Remember, the most expensive bike is not always the best, and there are many affordable options that offer excellent performance and value. By setting a budget and considering the ongoing costs of ownership, you’ll be able to find the right sportbike that fits your needs and your budget.
Find the Right Size:
When buying a sportbike, it’s important to find the right size and fit to ensure maximum comfort and control while riding. Here are a few tips to help you find the right size:
- Consider your height, weight, and inseam length: The size of a sportbike can greatly affect how comfortable and in control you feel while riding. Use your height, weight, and inseam length to determine which bikes might be the right size for you.
- Test-ride several models: The best way to determine the right size is to test ride several different models. This will give you a chance to get a feel for each bike and see how well it fits you.
- Check the seat height: When test riding, pay attention to the seat height. You should be able to comfortably reach the ground with both feet while seated on the bike.
- Consider the reach to the handlebars: The reach to the handlebars is also important, as it affects your comfort and control while riding. Make sure the reach is comfortable and that you can easily reach the controls.
- Check the weight: The weight of a sportbike can greatly affect how comfortable and in control you feel while riding. Be sure to take note of the weight of each bike you test ride and consider how it affects the overall feel of the bike.
By considering your height, weight, and inseam length, and test riding several models, you’ll be able to find the right size and fit for your needs and ensure maximum comfort and control while riding your sportbike.
Inspect the Bike Carefully
Before you buy a sportbike, inspect it carefully for any signs of damage or wear. Check the wheels, tires, brakes, and suspension for any signs of damage, and make sure the engine runs smoothly and quietly. If you’re unsure about anything, have a mechanic inspect the bike before you make a purchase.
Additionally, pay attention to the bike’s overall appearance. Look for any signs of rust or corrosion, especially in areas such as the exhaust pipes, frame, and suspension components. Check the battery to make sure it holds a charge and has enough power to start the engine. Test the bike’s electrical system to ensure all lights, signals, and gauges are working properly. Check the air filter and oil level, and make sure the bike has been properly maintained and serviced according to the manufacturer’s guidelines.Another important aspect to consider is the bike’s history. Make sure to request a vehicle history report to determine if the bike has been in any accidents, or if it has a clean title. If you’re buying a used bike from a dealer, ask about the previous owner and if the bike has been well taken care of. If you’re buying from a private seller, be cautious and take a close look at the bike to see if it has any signs of abuse or neglect.
It’s also important to test ride the bike before making a purchase. This will give you a good feel for the bike’s handling, braking, and acceleration. Take the bike on different types of roads, including highways, twisty roads, and stop-and-go traffic, to get a good idea of how it handles different conditions. This will also help you determine if the bike is comfortable for you and if it’s the right size and fit for your needs.
In summary, thoroughly inspecting a sportbike before making a purchase is a critical step in ensuring you’re getting a high-quality, reliable machine that will provide you with years of riding enjoyment.
Research the Model and Brand
When researching a sportbike, it’s important to take a deep dive into the model and brand you’re interested in. This will give you an understanding of the bike’s history, reliability, and any common problems riders have experienced. Start by reading reviews from trusted sources to get a better understanding of the bike’s strengths and weaknesses. You can also visit online forums and read what other riders have to say about their experiences with the bike. Ask questions and take note of any common complaints or issues that have been raised. This information can be invaluable in helping you make an informed decision. Additionally, consider reaching out to the manufacturer or a dealership to learn about any current or upcoming models that may interest you. It’s always a good idea to do your due diligence before making a big purchase, and researching the sportbike you’re interested in is a key step in that process.
Conclusion
In conclusion, when it comes to buying your first sportbike, there are many factors to consider. From determining your riding style and setting a budget, to finding the right size and fit, and carefully inspecting the bike before making a purchase, each step is important in ensuring you make the right choice for your needs. Additionally, researching the model and brand you are interested in will give you valuable insight into the bike’s history, reliability, and common problems. With this information, you will be able to make an informed decision and enjoy many years of thrilling riding. Don’t be afraid to take your time and shop around, the right sportbike is out there waiting for you. Happy riding!
Post Views: 268 -
How To Start A Yamaha R6
Starting a motorcycle is easier than it used to be, thanks to technology. While there are various kinds of bikes, starting a Yamaha R6 or other fuel-injected motorcycles is more or less then same across the board.
Here is how you start a fuel-injected motorcycle, like the Yamaha R6:
How To Start A Yamaha R6 Starting The Engine of a Yamaha R6
You can find this information in the owner’s manual of your bike, too. Before starting the bike, make sure you have done the following:
- The transmission is in neutral.
- The transmission is in gear, the clutch is pulled, and the kickstand/sidestand is stowed. Some modern models, Yamaha included, have a safety feature that will prevent the bike from starting if the sidestand hasn’t been raised.
Next, follow these steps precisely:
- Insert the key into the ignition.
- Turn the key to the ON position. Make sure the engine stop switch is set to the correct position.
- Warning lights and indicator lights should illuminate momentarily then disappear if conditions are satisfactory. These lights include:
- Oil level
- Coolant temperature
- Fuel level
- Shift timing
- Engine problems
- Immobilizer system
- Shift the transmission into neutral. The light should come on. If not, you might have an electrical circuit problem.
- Start the engine with the start switch.
- In the event of failure, wait a few seconds and try another start. Don’t draw out the time trying to start the engine to preserve battery power. Do not extend for more than 10 seconds.
General Instructions for a Fuel-Injected Motorcycle
Here’s some instructions to follow if you don’t have the make/model mentioned above:
How To Start A Motorcycle
- Put the motorcycle in neutral. Neutral is always located between 1st and 2nd gear.
- Put the key in the ignition if necessary.
* Note: Fuel-injected motorcycles have an engine management system. This means you don’t have to worry about using the choke lever. Only a small amount of throttle will be needed, regardless of engine temperature. - Start pulling the clutch near the left handlebar. Some riders choose to pull the clutch and front brake simultaneously, but the choice is yours.
- Press and hold the start button. You will find this on the right handlebar. Maintain your hold on the clutch.
- The motorcycle should automatically catch and start.
- If the engine doesn’t turn over and start immediately, you can try using the throttle while pressing the start button. Make sure you are holding the clutch.
- Remember to never crank the engine for more than 10 seconds clips at a time. Otherwise, you’re wasting battery power.
- You can slowly start to release the clutch.
Now, you’re ready to ride!
Final Thoughts
Unlike carburetor motors, fuel injection systems rarely fail. To prevent the pump from failing, do some routine maintenance. Get into the habit of listening to the bike and know what a healthy running engine sounds like. That way, if something unusual happens, you will be able to tell whether or not something is wrong with the pump fuse by sound alone.
Modern fuel-injected motorcycles are easy to start. Follow the instructions in this article, and you will have no problem.
For more information about how to start, ride, and care for your motorcycle, check out my YouTube channel. Hit the subscribe button for notifications whenever there’s an update.Post Views: 10,069 -
The Ultimate List Of Motovloggers On YouTube
What Is A Motovlog?
Simply put, motovlogging is when you attach a camera to yourself or your motorcycle and record your ride. Wikipedia defines it as:
A motovlog is a type of video log recorded by a person while riding a motorcycle. The word is a neologism and portmanteau derived from “motorcycle”, “video” and “log”. A rider who creates video blogs known as a moto blogger, and the action of making motovlogs is called motovlogging. Most motovloggers upload their videos on YouTube, and the network of motovloggers here is known as the motovloggers community.
Who Was The First MotoVlogger?
While it’s specifically documented when the first motovlog was created, the earliest motovlogging channels on Youtube is M13 which started in 2006.
Mordeth13
Are you looking for motovloggers to follow?
Since then the motovolgging community has exploded. Each rider has a different style of riding, a different sense of humor, and a different style of teaching.
While I’m positive this isn’t a complete list, I’m sure you’ll find a channel here that will peak your interest. Make sure you check back frequently because I’ll be adding to this list.
If you’re a motovlogger that would like to added to this list simply follow me on YouTube and fill out my contact form and I’ll get you added!
Check Out These Articles:
Shout Out To PhatboyR6 and No.Bumpers for helping me come up with this collection of motovloggers. So here they are in no particular order!
Post Views: 36,913